
So, this is the final version of the plate for the party next weekend. I made enough for all and sundry. I hope they like it.
Have a wonderful Mother's Day, and treat them nice!
I have 5 brothers and sisters, and when we started having children, the yearly excursions to a restaurant, with crying babies, impatient toddlers, long waits, crabby waitresses made it not-so-much-fun. So now we have a nice family party at my house every year. The food is ordered, and I used to use paper plates (no extra work for MOM!).
But now we use all the beautiful handmade plates I’ve been collecting for the last 10 years. I try to get two of each potter I admire, so we have a nice time deciding which to use for the dinner.
But I had no plates for dessert!
So, two years ago I started making a few dozen dessert plates, and sent everyone home with a sticky handmade plate, that they tell me they use for breakfast, sandwiches, etc. It really makes me happy.


I have to plan ahead, so here are some details of the making of this year’s plates.
First I decided on a shape, from a great box I got from some pajamas:

I tried to roll out a slab, cut out the shape and dry it slowly on a foam pillow. Two problems: only had two foam pillows, so this will take forever, plus one more day!
Also, the plates dried almost totally flat, so they just seemed warped.
So, I threw some hump molds. Using a technique I remembered from Bill Van Gilder’s DIY show, I threw upside down bowls, with a stand in the middle like a cake stand. This form then can be trimmed to the curve I wanted. Added bonus: I marked up the hump mold with circles, and then divided the circle into 3rds, 4ths and 5ths as guidelines. These worked out great!


I can put the slab onto the hump mold, using my guidelines to center it. Then I use the pajama box insert as a template, cut my slab, soften the edges, and voila! Good to go.


I still have to decide on this year’s decoration. I make a laser decal from some of my brushwork, and keep the glaze design consistent, sort of.
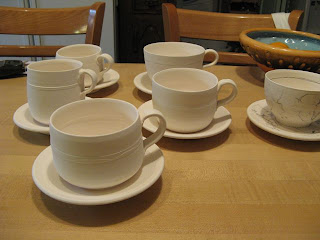
My Mom collected fancy cup and saucer sets. As we grew up we were allowed to use them for dessert-time on family holidays. Each one had a very unique personality – we even named some of them. Everyone had their favorite.
So one of the fun items I tried this year was my own version of collectible cups and saucers. They were a lot of fun to make, and as I sat down to decorate them I hit a roadblock – so hard! It now makes total sense that factories had specialized ‘decorators’ who never made the forms. It is a totally separate mindset.
I have always been a fan of the Bloomsbury Group. The lush, decorative interiors are just the sort of world I’d love to crawl into. I remember reading about Quentin Bell, Vanessa Bell’s son, on growing up in that household. He trained as a potter, and had a studio set up at Charleston, their country house:
‘For many years after the war, when Quentin was married and living far from Charleston in the north of England, he would return with his family, and work in the pottery during the holidays. Duncan and Vanessa loved to find a pristine set of cups and saucers newly fired and ready to be painted – rather to Quentin’s chagrin, for he was looking forward to painting them himself!’
from ‘CHARLESTON A Bloomsbury House and Garden’
by Quentin Bell & Virginia Nicholson
I wish Vanessa and Duncan could visit, and steal away my bisqued cups & saucers!
Here are my attempts – Day of the Dead, with a Mexican influence, and Kitchen wallpaper (self-explanatory).


